Rubies are premium upgrade materials in Doom: The Dark Ages, which you use to max out your weapons to their second and third tier. Although Wraithstones are required for maximum-level upgrades, Rubies provide a huge early to mid-game power boost. Because they come in limited amounts and are hard to find because they’re strategically placed, gathering all the Rubies is necessary if you intend to maximise your arsenal.
- Ruby Locations in Doom: The Dark Ages
- Chapter 4 – Sentinel Barracks
- Chapter 5 – Holy City of Aratum
- Chapter 6 – Siege Part 1
- Chapter 7 – Siege: Part 2
- Chapter 8 – Abyssal Forest
- Chapter 9 – Ancestral Forge
- Chapter 10 – The Forsaken Plains
- Chapter 14 – Spire of Nerathul
- Chapter 16 – Kar’Thul Marshes
- Chapter 19 – Harbor of Souls
- Chapter 20 – Resurrection
- Chapter 22 – Reckoning
Ruby Locations in Doom: The Dark Ages
Chapter 4 – Sentinel Barracks
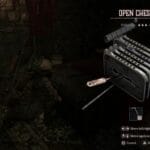
Location 1

This Ruby is handed to you as you complete the main quest. It’s not hard to miss: in the middle of a combat sequence along the Sentinel armoury, the Ruby will be directly in your way after you kill a mini-boss.
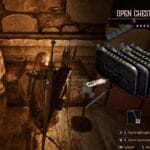
Location 2

When you come to a big broken walkway around the middle of the chapter, glance down and slightly to the right.

Jump off the ledge to a partially obscured ledge, and then platform across a system of narrow tunnels to a hidden room with the second Ruby. Employ the Shield Recall ability for mid-air travel when platforming.
Chapter 5 – Holy City of Aratum
Location 1

With the new weapon received (most probably the Burstfire Bow or the Hallowed Blaster), make your way to the front until you reach a locked metal door.

Above this door, check for a red glowing lock and throw your shield to destroy it. The Ruby is located on the other side of the door, resting over a ceremonial altar.
Location 2

Discover the hidden landing point with a massive metal button at its centre. Pressing the button will open a nearby water pit. Swim down, locate the Valve, and operate it to drain a tunnel filled with the Red Keycard.

Activate this card to unlock a caged vault just above the pit where the Ruby is. Don’t forget to press the nearby Life Sigil to save progress before swimming in.
Chapter 6 – Siege Part 1
This chapter is filled with Rubies but also with sneaky navigation and environmental puzzle solutions.
Location 1

Located in a demon-infested corridor early in the level. Clear out enemies to disable a gate preventing access to the Ruby.
Location 2

Locate the Ruby trapped in a chamber with barred doors. There is a flooded room close by — swim through the water and locate an underwater corridor leading to a concealed switch.

Activating the switch unlocks the cage and reveals the Ruby. Activate Sentinel Vision if you’re struggling to find the underwater path.
Location 3

Scattered across this section are four Wolf Statues. Destroy all of them to lower the force field surrounding the Ruby.

The statues may be perched above doorways or behind breakable walls.
Location 4

Hidden behind a Secret Key Door. First, locate the Secret Key (see the Secret Key Guide for Siege Part 1), then proceed to the vaulted corridor indicated by Necron runes. Unlock the chamber using the key and obtain the last chapter’s Ruby.
Read More: All Secret Key Locations in Doom: The Dark Ages
Chapter 7 – Siege: Part 2
There are only two Rubies here, but both are worth picking up. Here’s where they can be found:
Location 1

The first one’s hidden behind a secret door. You’ll need to track down the secret key in this area first.

Once you’ve got it, backtrack to the marked spot (check your map if you’re unsure). Expect a fight—some demons guard the place—but once they’re down, the Ruby is yours.
Location 2

This one is much simpler. Continue to follow the main quest until you can access the open shipyard sector. Rather than proceeding straight on, ascend the stack of crates hidden off in the corner and move along. The Ruby’s at the top.
Chapter 8 – Abyssal Forest
Two Rubies here too, both concealed just off the side path.
Location 1

Once you fall into the second central zone, search around the perimeter for a lower pathway. Fall and explore a bit—you’ll pick up some gold on the way—and soon come across the first Ruby.
Location 2

Continue with the main quest until you find yourself at the debris-clearing ballistic cannon. Just to its left, there is a jumpable platform. Hop over a couple of ledges and you’ll be exactly where the second Ruby is concealed.
Chapter 9 – Ancestral Forge
Another chapter has only two Rubies, and you can collect both with a bit of climbing and some work with the shield.
Location 1

Make your way to the top of the map, close to where the spot is marked. There is a curving path that goes up—just keep on going up.

At the top, next to the Vagary toy, lies the Ruby.
Location 2

This one’s locked behind a door on the ship. Look closely for a small opening near it—you’ll spot a red lock behind a grate.

Use your Shield Saw and toss it through the gap to break the lock. Once the door opens, Ruby’s inside.
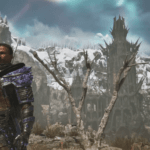
Chapter 10 – The Forsaken Plains
Three Rubies here, and most of them aren’t too tricky. Here’s the breakdown:
Location 1

Right outside another of the Gore Nests.

Go to the indicated spot and destroy the nest first—the Ruby unlocks once destroyed.
Location 2

This one’s hidden behind a secret door. Get the Secret Key for the region first, then go to the indicated spot.

Open the secret door, defeat a group of enemies, and the Ruby will be waiting on the other side of the room.
Location 3

To acquire this last Ruby, head to the Shrine on your map in the area. On its right-hand side, there is an elevator—take it all the way to the highest platform and collect the Ruby sitting atop it.
Read More: All Wraithstone Locations in Doom: The Dark Ages
Chapter 14 – Spire of Nerathul
The Spire of Nerathul has three Rubies in total—one at the first dragon landing zone and two more at the second. Here’s how to pick them up:
Location 1

When you get to the first landing place in the main quest, find a boost pad around the area. Use it to propel yourself up onto the wooden boards above. The Ruby is sitting at the very top—easy to see, but easy to overlook if you don’t look up.
Location 2

This one’s out in the open but unattainable—until you figure out the trick. Go to the second landing point, and search for the locked door where the Ruby is taunting you behind the glass.

Take a plunge into the water near you, then swim through the underwater tunnel. Watch out—avoiding the fireballs is the trick here. The tunnel spits you out exactly where you want to be.
Location 3

Again, at the second landing zone, this time one that is coupled with a combat battle, Follow the story through until you are in a grand chamber. Clear out the demon wave within it, and when the dust clears, the Ruby will be an available reward.
Chapter 16 – Kar’Thul Marshes

There’s but a single Ruby here—but achieving it involves puzzle-solving and hopping between dimensions.

Make your way to the room that has been marked on your map. Once inside, you’ll be pulled into another dimension. Start by jumping into the water to land on a platform. From that height, aim and toss your Shield Saw at a distant red lock.

With that unlocked, drop down and align the two frames of the Cosmic Eyes puzzle. Smash the frame with your shield, then jump back into the water, land on the platform again, and get to the Ruby from above.
Chapter 19 – Harbor of Souls

There’s one Ruby here, and it’s behind a quick reflex puzzle. Walk along the path with the story until you arrive at the central elevator designated on the map. Travel up it, then search around for a platform close by with a big red button.

Stand on the button, then toss your Shield Saw over to strike the energy modules in front of you. This will unlock the door securing the Ruby.
(Note: Don’t recall your shield until you collect the Ruby, or the door will close once more.)
Chapter 20 – Resurrection
This chapter has three Rubies tucked away in different spots—some easy, others behind locked doors.
Location 1

This one’s simple. Reach the area marked on your map, and you’ll find the Ruby sitting at a statue. No puzzles, no enemies—just grab it and go.
Location 2

To obtain the second Ruby, you’ll have to locate the Blue Key first. With it, unlock the door in close proximity and head upwards along the path to earn your reward.
Location 3

Another Blue Key door is in your way here. Utilize the same key used previously to unlock the gate at the indicated location.

In the interior, a flood of enemies awaits—clear them and the Ruby is yours.
Chapter 22 – Reckoning
The last chapter offers you one last chance at grabbing the Rubies. There are three in all, and they’re some of the most difficult to obtain.
Location 1

This one’s in a hidden vertical section. After reaching an elevator, look around before riding it up. You’ll spot a Blue Button nearby—throw your shield to activate it, which will drop a climbable wall.

Scale it, then repeat the process with another Blue Button and another wall. Once both platforms are up, recall your shield to create the final bridge, then climb to grab the Ruby.
Location 2

This Ruby is easy to see but locked behind a door. Go to the highlighted hall and seek out a fall zone at the far end. Jump down to discover a booster pad underneath.

Leap onto it to get to the highest platform, then sprint in the direction of the Ruby and drop into the next room to claim it.
Location 3

The last Ruby in the game is locked behind a secret door. You’ll need to find the secret key in this area, then return to the marked location to unlock the door and secure your final upgrade material.