
There are many settings in AION 2 that may influence how you control the game, how the visuals look, and many other aspects of the gaming experience. While default settings work just fine, some tweaks will make the combat, movement, and overall performance more pleasant. In this guide, we will discuss what settings you should change to get the best experience of using AION 2. These settings are mostly meant to make the game comfortable to play.
AION 2 Best Settings
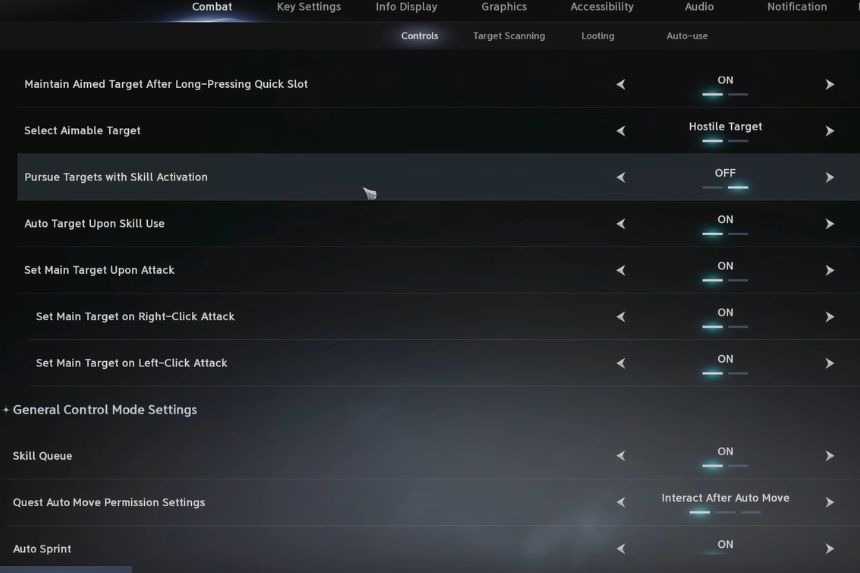
Begin with the settings under Control. Change the control mode to AION 2 and leave the display turned on. Adjust Aim should remain at 120, as this will be good enough for normal play.
Ensure Maintain Aimed Target After Long Pressing is enabled. When it comes to Pursue Targets With Skill Activation, enable it if you would like your character to pursue targets during skill activation. This setting can come in handy when farming in the open world.
Auto Target Upon Skill Use is disabled by default, but it will help with such game modes as PvP and raiding where targeting the enemy fast is crucial.
When it comes to Set Main Target Upon Attack, enable it. The main target can also be activated upon a right- or left-click attack. The other skill settings can remain on their default setting.
Auto-Use Settings
Auto-Use options allow you to control situations where the character uses potions and other items automatically. Conditions for automatic potion usage can be set here, along with the selection of items to be used automatically. Players who prefer manual use of items can disable these options.
Key Bindings
Default key bindings are very comfortable, and only a few modifications should be made. Bind Sprint to Caps Lock instead of Shift, making it easily accessible. Considering that flying is widely available in AION 2, bind Fly to one of the accessible mouse buttons if there are some additional buttons on the mouse. The back mouse button will do just fine for that purpose.
The default Mount key binding on C is good. The macro can be rebound to one of the mouse buttons since it will probably be used quite often. Interact on F and Power Shard on B are very convenient, and they can be left as is.
By default, Auto-Use Potion is bound to the X key. This can be changed if using potions unintentionally causes problems. Default Tab Targeting and Movement keys will work just fine. There are no other major modifications that should be made. Targeting Hostile Players key can be added for PvP mode separately.
Menu and Hotkey Layout
The map key changed from M to Tilde, making it easy to reach. All other content-related hotkeys can be changed depending on the usage frequency of different menus. It is possible to place the Transparent Map hotkey closer to the main map hotkey, Alt + Tilde, at a later stage of configuration. These hotkeys are not very important and do not require a lot of time to configure.
Display and HUD Settings
Not many changes are necessary in the Display category. Once you become familiar with the game, you can hide such items as the plate with your name and information about the pet. The HUD Key Guide can also be disabled after you get used to it.
One option from this category deserves special attention: Display Boss Orientation Indicator, which falls under Combat display. It is disabled by default, but it would be useful to turn it on because it will help you navigate directions of the boss during battle. The Floater options should remain enabled.
Graphics and Performance Settings
The following settings are for an intermediate-level PC. Stronger computers will allow some options to be upgraded, whereas weaker computers will make some options go down. First, use Borderless Window mode. This will make switching from the game to other applications simpler.
Next, turn off Vertical Sync. If it is on, then change the refresh rate to that of your monitor’s highest refresh rate. Resolution Scale should be set to Native, and the UI Proportion setting should be set to Medium. The Texture Quality should be set to High because it relies on VRAM mostly.
Set Effect Quality and Mass Combat Quality to Normal. Reduce them to Low if performance suffers from huge battles. Model Quality and View Distance should be kept at High if you have plenty of VRAM on your video card.
Vegetation Quality and Shadow Quality are best set to Normal, as they offer good value for money for most gamers. They may be reduced further on underpowered systems or where additional FPS is required for PvP mode.
Shading Quality should be kept at High. Should the performance suffer, reduce Global Illumination to Very Low. Reflection Quality and Cloud Quality should be kept at Normal. These two settings may be reduced for better performance if required. Set Post-Processing Quality to Normal, while Anti-Aliasing should be kept at High.
Upscaling and Frame Generation
The Upscaler needs the GPU. For AMD GPUs, FSR will be a good alternative. For Nvidia GPUs, DLSS will be a better option. TAA and TSR will also be alternatives, but DLSS and FSR will be the two primary choices for most users. Frame Generation can be turned on if the hardware supports it and you need more FPS.
For Player Particle Effect Display, choose the Self and Party mode to make sure that important effects will be visible, but not the effects of each and every nearby player. Volumetric Fog should be turned off for performance reasons.
NCAO can be chosen instead of GTAO in the Ambient Occlusion section. Change the Water Reflection Method to Performance rather than Quality to lower the system’s load. In case of Nvidia GPUs, choose Nvidia Reflex and enable the Boost option. It might help in lowering your latency, especially if the CPU is bottlenecking.
Camera and View Distance
There are very few changes that need to be made in Camera settings. If your PC is capable of coping with it, leave Maximum View Distance set to Far, which will allow you to see objects and players from a greater distance. Disregard Camera Shake Effect. Camera shaking can distract you during battles, particularly if there are many visual effects on the screen.
Accessibility and Audio
Mostly, the Accessibility setting relies on personal preferences. Change the font colour of the chat, switch on/off chat voice, and change subtitles as per requirement. In case of audio settings, the Master Volume can be changed to about 30%, which will further depend on the required volume level.
It is possible to change the microphone volume as well using this option. There might be some sounds, like wing sound, that could become irritating after a long session. This can be controlled individually. In the advanced audio setting options, you can turn on 3D Audio and choose your audio device, such as headphones.
Notifications and Alerts
The notifications are dependent on the number of alerts that should be received while playing. If you find that the Hit Alerts from Other Players and HP Danger Alert options are helpful, then activate them. HP Danger Alert comes in handy since it serves to inform the player that his/her health is getting lower.
Notification requests may also be switched on or off. In order to avoid any unnecessary requests, make sure that auto-decline duel requests and auto-decline friend requests are selected. These settings are quite useful in AION 2. They may be changed in the future.