Destiny 2 The Final Shape is here and with it comes a slew of problems such as the game stuttering, lag in multiplayer, and low frame rate. Besides this, there are some bugs in the missions that players have been reporting. In this guide, we will show you a comprehensive way to resolve most of the performance issues with the game. So, keep reading to fix the Destiny 2 The Final Shape lag, stutter, and low FPS issues.
- Fix Destiny 2 The Final Shape Lagging, Stuttering, and Low FPS – Boost FPS Guide
- Change In-Game Settings
- Use ISLC to Clear Memory Standby List
- Disable Power Throttling (Laptop Users)
- Disable Game Bar
- Turn on Game Mode
- Turn on Hardware Accelerated GPU Scheduling & Optimizations for Widnowed Games
- Adjust Appearance & Performance and Increase Virtual Memory
- Use Exit Lag for FPS Boost and Reduce Lag
- Change Compatibility Settings
- Enable Clean Boot
- Create Registry Backup and System Restore Point
- Download our Custom FPS Pack
- Watch the Fixes on Our YouTube Channel
Fix Destiny 2 The Final Shape Lagging, Stuttering, and Low FPS – Boost FPS Guide
The guide covers every aspect of the OS and game settings to boost FPS. It also addresses network aspects to fix lag and stutters. Here are the fixes.
Change In-Game Settings
The first fix you should try is to change certain in-game settings that will keep the visual fidelity intact while boosting the game’s performance. Here are the settings you need to change:
- Run in Windowed Fullscreen
- Set the Texture Anisotropy to 4x
- Disable Depth of Field
- Disable Motion Blur
- Disable Wind Impulse
- Disable Chromatic Aberration
- Disable Film Grain
Use ISLC to Clear Memory Standby List

ISLC clears the RAM cache and frees the RAM to be used by Destiny 2. The software comes from the makers of DDU, so it’s trustable. Using this software, you will see an immediate improvement in performance and reduced stutters. After installing the software, keep the default settings and hit Start.
Disable Power Throttling (Laptop Users)
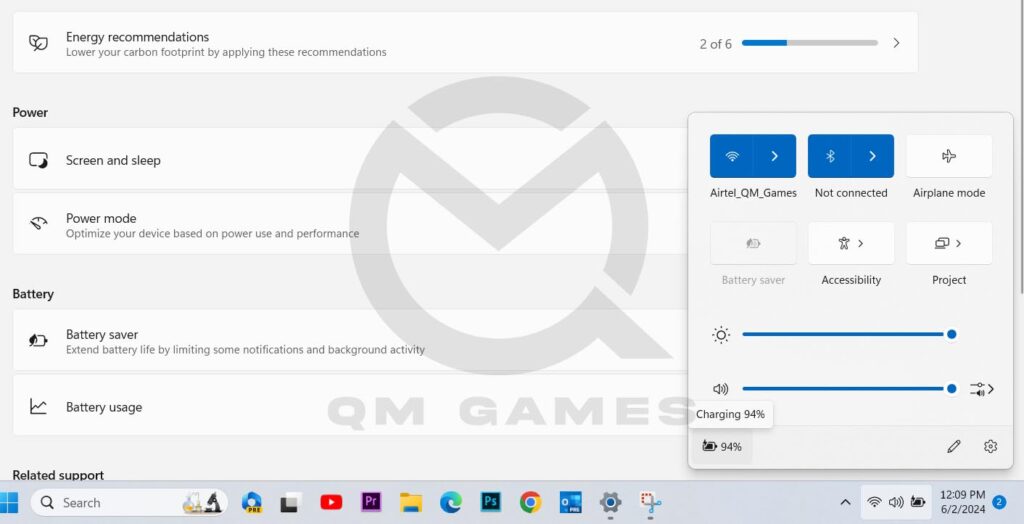
Laptop users can use the disable power throttling to boost the game’s performance. To do this, click on the Battery Icon in the tray bar > click on the charging icon > Power Mode > Set for Best Performance.
Disable Game Bar
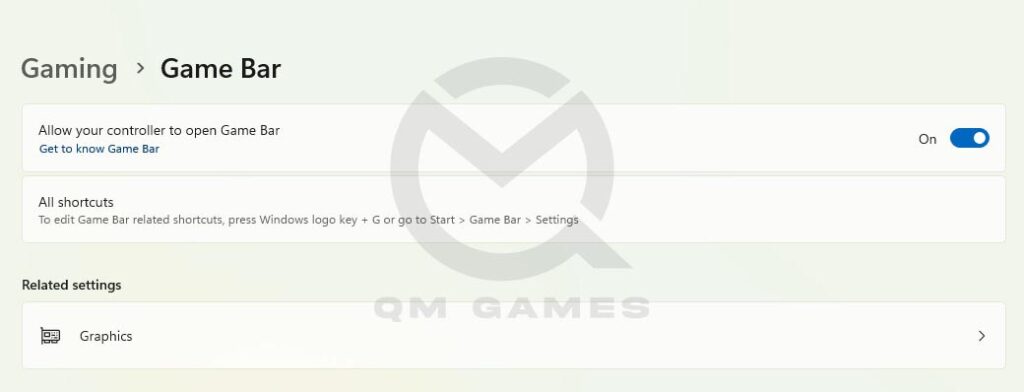
Running the game bar can consume resources in the background, although marginal, you should disable this to see a slight increase in performance. Here are the steps you can follow:
- Press Windows key + I to go into Settings
- Then, go into Gaming > Game Bar
- Toggle Off the Game Bar
Turn on Game Mode
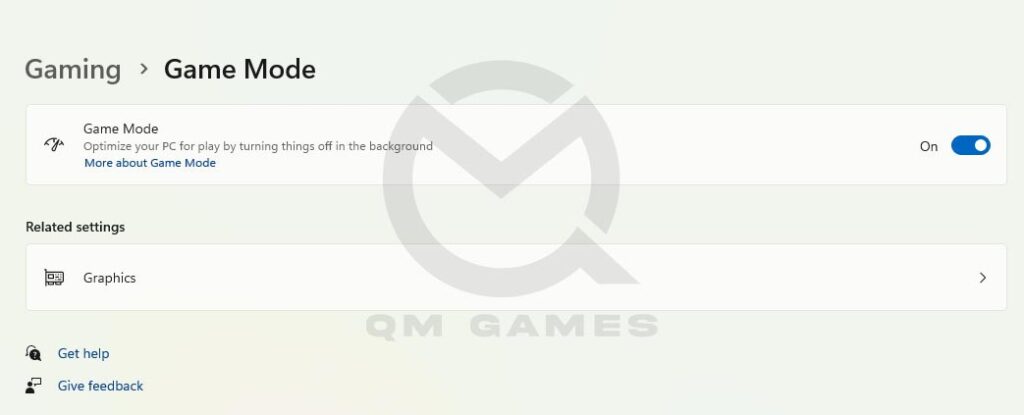
The game mode is great for optimizing the PC to produce more performance to run the game. It does so by disabling unnecessary background applications. Here are the steps to enable the Game Mode.
- Press Windows key + I to go into Settings
- Then, go into Gaming > Game Mode
- Toggle On the Game Mode
Turn on Hardware Accelerated GPU Scheduling & Optimizations for Widnowed Games
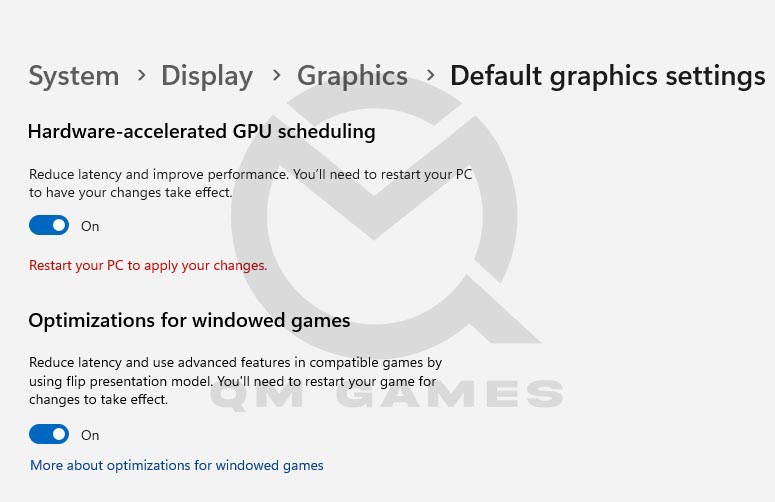
In this fix, we will set the game for the best-performing GPU instead of allowing the OS to decide. We will also enable Hardware Accelerated GPU Scheduling & Optimizations for Widnowed Games. Here are the steps:
- Press Windows key + I to go into Settings
- Then, go into Gaming > Game Mode > Graphics
- Click on Browse under Custom options for apps and add the game executable to the list
- Click on Options on the Destiny 2 file and choose High-Performance GPU
- Next, click on Change default graphics settings at the top under Default settings
- Toggle on Hardware Accelerated GPU Scheduling & Optimizations for Widowed Games
- You will need to reboot the PC for the changes to take effect.
Adjust Appearance & Performance and Increase Virtual Memory
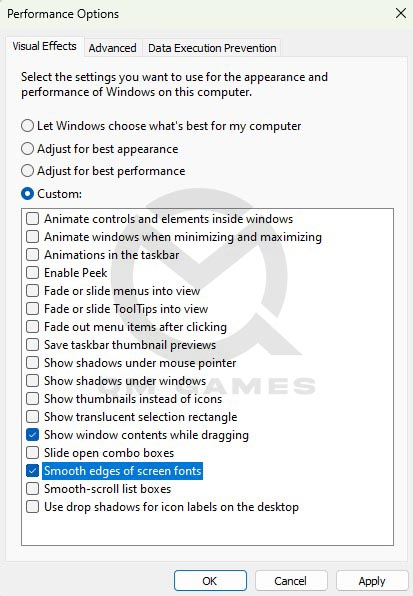
- In the Windows Search, type and open Adjust the appearance and performance for Windows
- Toggle on Adjust for best performance
- Now check Smooth Edges of Screen Fonts and Show Window Content While Dragging (if you toggle off these two options, the OS experience will suffer. You can try all the options and see which you care for and disable all others.)
- Save the changes.
- Next, go to the Advanced tab and click on Change under Virtual Memory
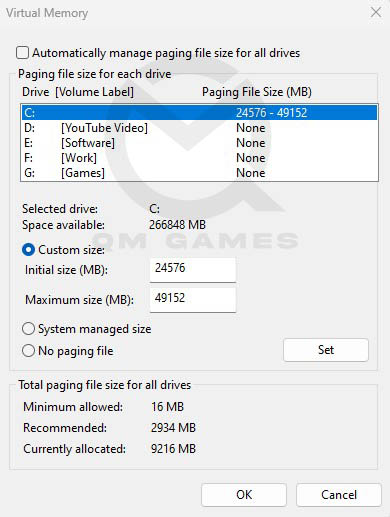
- Uncheck Automatically manage paging file size for all drives
- Check Custom Size and enter the below values
- Initial Size (MB) – 1.5 X Total RAM (For 16 GB RAM, 16 x 1024 MB = 16,384 MB, 16,384 MB x 1.5 = 24,576 MB)
- Maximum Size (MB) – 3 X Total RAM (For 16 GB RAM, 16 x 1024 = 16, 384 MB, 16,384 MB x 3 = 49,152 MB)
- Click on Set and OK.
Use Exit Lag for FPS Boost and Reduce Lag

ExitLag is a comprehensive software with several tools to boost the FPS. It also provides optimized connection routes to your game servers for reduced lag. Once you install the software, search for Destiny 2, choose the nearest servers, and experience the lowest lag possible. You can use this link to download Exitlag.
Change Compatibility Settings
The next fix is to change the compatibility settings to disable the fullscreen optimizations, change High DPI settings, and optional – provide admin permission to the game. Here are the steps you can follow:
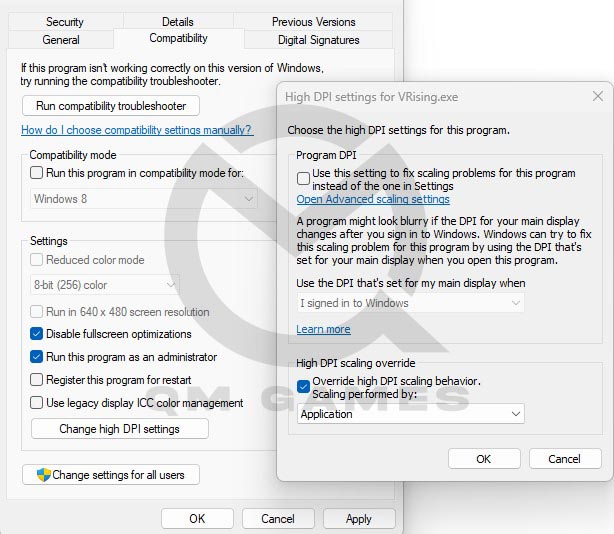
- Go to the Game Settings on Steam > Installed Files > Browse
- Right-click on the .exe file and choose Properties
- Go to the Compatibility tab
- Put a check on Disable fullscreen optimizations and (optional – Run this program as an administrator)
- Click on Change high DPI settings
- Put a check on Override high DPI scaling behavior. Scaling performed by: Application
- Save the changes.
Enable Clean Boot
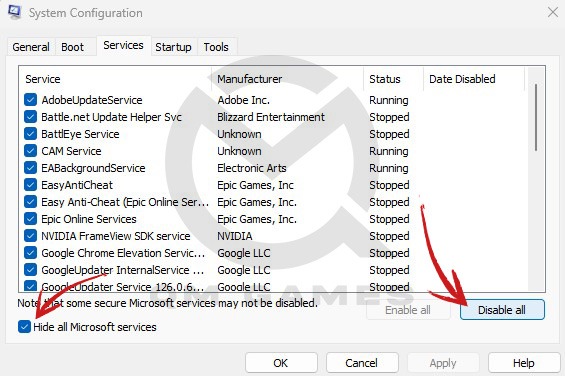
A clean boot ensure that no background applications are hampering the process of the game and you get better FPS due to all third-party programs and startup programs being closed. Here are the steps you can follow:
- Press Windows Key + R and type msconfig, hit Enter
- Go to the Services tab
- Check Hide all Microsoft services (Very Important)
- Now, click Disable all
- Go to the Startup tab and click on Open Task Manager
- Disable one task at a time and restart the system.
Create Registry Backup and System Restore Point
You need to create a registry backup or a system restore point for the next fix, which is to install our own custom settings that will reduce lag, boost FPS, and eliminate stuttering. Here is how to create a Restore Point.
Crete a restore point
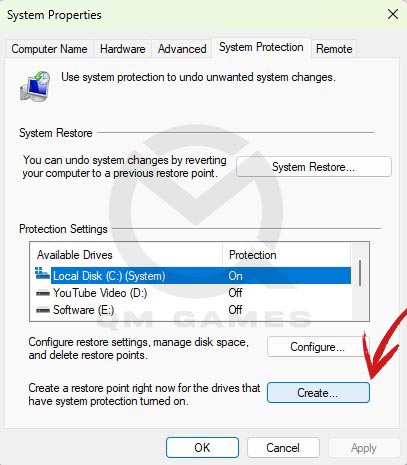
- In the Windows Search type, Create a Restore Point
- Choose the OS Drive and Click on Create
Use the Restore Point
- In the Windows Search type, Create a Restore Point
- Click on System Restore and follow screen prompts.
Download our Custom FPS Pack
We have created a list of Registry Files that you can download from our Google Drive and double-click to install them. These files will bring specific changes to your registry that will fix the Destiny 2 lag and stuttering and boost the game’s FPS.
