With the recent official release of The First Descendant, players have taken up arms to join the fight against enemy forces. There are a lot of things that are happening in a campaign run or boss fights when playing The First Descendant. Despite such complex mechanics being present in a lot of games, this game just doesn’t perform as well as it should. Even with a cutting-edge rig, people are facing FPS drops. Reports of low FPS in this game have been seen even when the user had a 3080ti and i7 10th Gen. This is similar to the performance issues that people experienced when playing Cyberpunk 2077 before the optimization updates rolled out.
- Best Settings to Minimize FPS Drops & Stuttering
- Change In-game Settings
- Use ISLC to Clear Memory Standby List
- Disable Power Throttling – Click on the Battery Icon > Power Mode > Best Performance
- Disable Game Bar & Turn on Game Mode
- Turn on Hardware Accelerated GPU Scheduling & Optimizations for Windowed Games > Choose High-Performance GPU
- Adjust appearance and performance – Set to Adjust for Best performance (check 1. Smooth Edges of Screen Fonts 2. Show Window Content While Dragging) and Increase Virtual Memory
- Change Compatibility Settings
- Enable Clean Boot
- Create Registry Backup and System Restore Point (Run- SystemPropertiesProtection)
- Download our Custom FPS Pack
Well similarly, there is not much that can be done before Nexon Games developer teams release official updates to fix the poor optimization. However, there are a few things that you can do to minimize the FPS drops and stuttering when playing The First Descendant.
Best Settings to Minimize FPS Drops & Stuttering
The following are the settings that you can apply to The First Descendant to maximize the performance that you can yield while playing. Note that this may reduce the quality of the graphics because it prioritizes performance over quality.
Change In-game Settings
Try to follow these steps in the order that they are listed.
- Go to C:\User\name\AppData\Local\M1\Saved\Config\Windows\Engine.ini and open the file.
- Add the following to the bottom of the file:
- [SystemSettings]
- r.MotionBlurQuality=0
- Click File, then Save and close it.
In-game Settings Guide:
- Start the game and go to Options.
- Go to the Display tab and select the resolution that you want to use.
- Go to the Graphic tab and choose the Present that you wish to.
- Turn DLSS/FSR off.
After we make changes to the .ini file, and then make changes to the in-game settings, that would reset the changes made to the .ini file. You do not want to do this. This means that you should never change the in-game settings after you have modified the .ini file. If you want to make any changes after this, do it from the .ini file after closing the game. Save the file and then launch the game. Repeat till you get desired results.
Now, these are the settings that we suggest for maximizing performance:
Go to C:\User\name\AppData\Local\M1\Saved\Config\Windows\GameUserSettings.ini
You will see these lines on the top of the .ini file:
- [ScalabilityGroups]
- sg.ResolutionQuality=100
- sg.ViewDistanceQuality=1
- sg.AntiAliasingQuality=1
- sg.ShadowQuality=1
- sg.GlobalIlluminationQuality=1
- sg.ReflectionQuality=1
- sg.PostProcessQuality=1
- sg.TextureQuality=4
- sg.EffectsQuality=4
- sg.FoliageQuality=1
- sg.ShadingQuality=4
- sg.MeshQuality=4
- sg.PhysicsQuality=1
If you opted for the Normal preset in the game settings, all of the settings above would be set to 2. You can set it from 0 to 4 (0 being the lowest, 4 being the highest). You have to modify these values according to the FPS you are getting when you play the game. For example, if you are not satisfied with the FPS you are getting, you can change the TextureQuality to 2, ShadowQuality to 0, and so on. Repeat the process till you get good performance.
Scroll down to see these lines:
- ViewDistance=1
- AntiAliasing=1
- PostProcessing=1
- Shadows=1
- GlobalIllumination=1
- Reflections=1
- Textures=4
- Effects=4
- Foliage=1
- Shading=4
- Mesh=4
- Physics=1
The Normal preset would set these to 2 by default as we mentioned earlier. Follow the steps you did for the settings before to adjust the settings to get the desired FPS. Now scroll down to find the following lines:
- bUseVSync=True
- bUseDynamicResolution=False
Change these to:
- bUseVSync=False
- bUseDynamicResolution=True
If you have a lower-end PC, it is best to turn on Dynamic Resolution to not lose frames during action scenes. If you want to cap the framerate, change this value:
FrameRateLimit= X.XXXXXX
Use ISLC to Clear Memory Standby List

If there is an optimization issue with the game, using the ISLC software from the makers of DDU can be of great help. The software frees resources by clearing the RAM cache. After installing the software, keep the default setting and hit Start.
Disable Power Throttling – Click on the Battery Icon > Power Mode > Best Performance
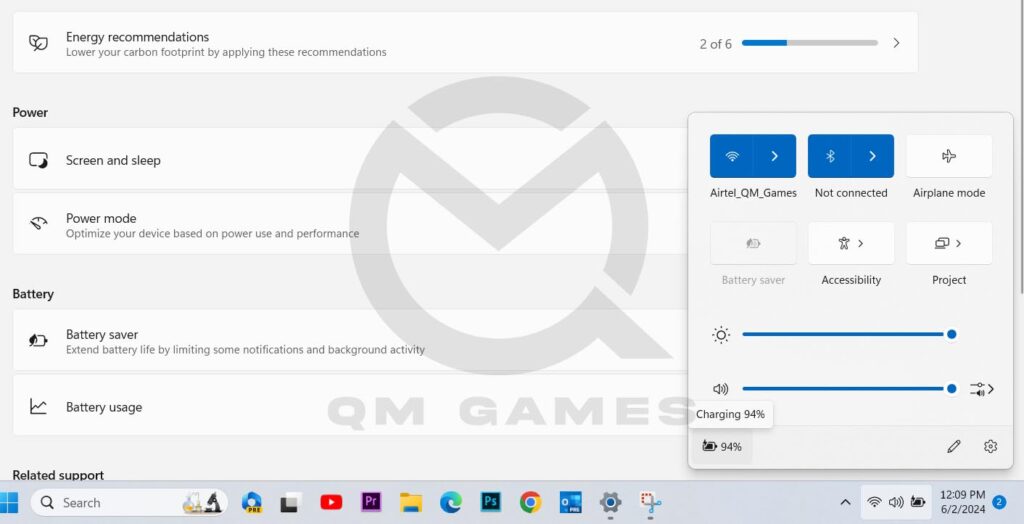
Laptop users can disable the power throttling by clicking on the battery icon at the bottom right of the screen and then from Power Mode, choose Best Performance.
Disable Game Bar & Turn on Game Mode
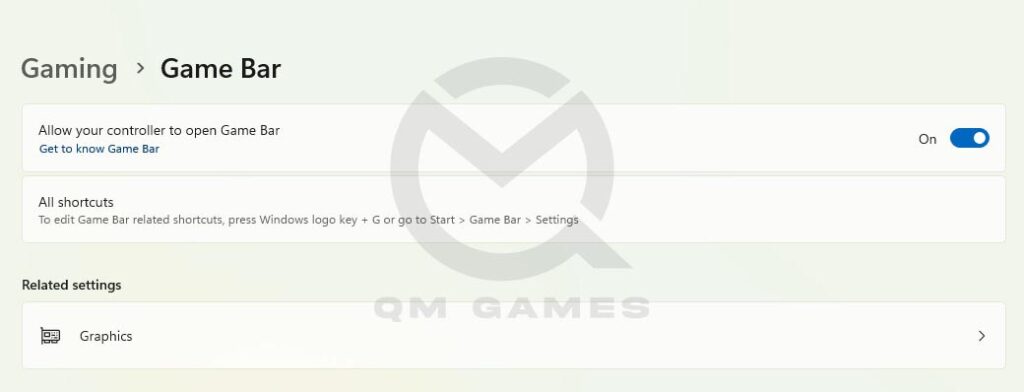
The game bar can consume resources in the background. Disable the game bar and turn on Game Mode to optimize windows for best performance while playing games. Follow the below steps:
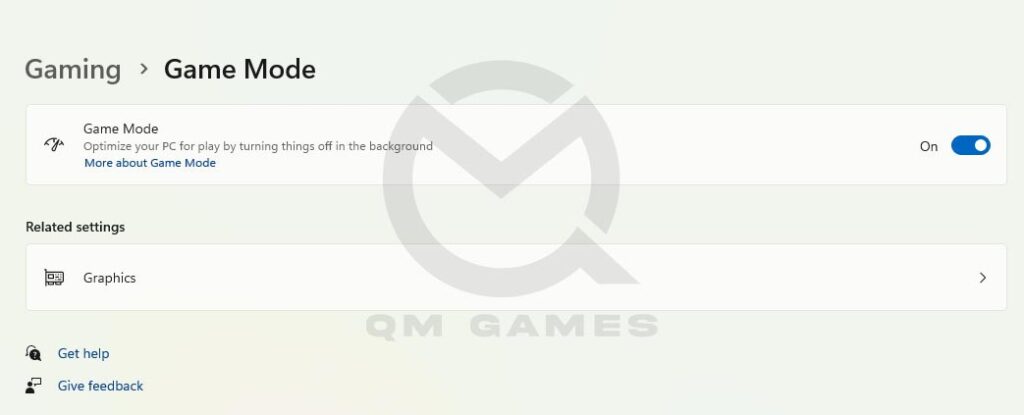
- Press Windows Key + I to go into Settings
- Click on Gaming
- Go into Game Bar and toggle it off
- Go back, and click on Game Mode, toggle it on.
Turn on Hardware Accelerated GPU Scheduling & Optimizations for Windowed Games > Choose High-Performance GPU
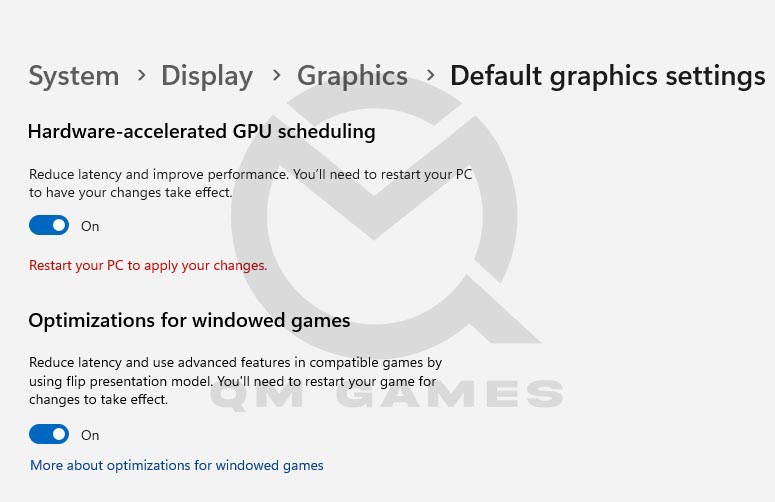
Next, let’s optimize the Windows further for best performance in The First Descendant and to boost FPS. Here are the steps you can follow:
- Press Windows Key + I to go into Settings > Gaming > Game Mode > Graphics
- Click on Browse (browse the game executable and add it)
- Once the game appears in the list of programs, click on the game and click Options
- Choose High Performance and click on Save
- Click on Change Default Graphics Settings
- Toggle on Hardware Accelerated GPU Scheduling
- Toggle on Optimizations for Windowed Games
- Reboot the PC.
Adjust appearance and performance – Set to Adjust for Best performance (check 1. Smooth Edges of Screen Fonts 2. Show Window Content While Dragging) and Increase Virtual Memory
Adjust appearance and performance
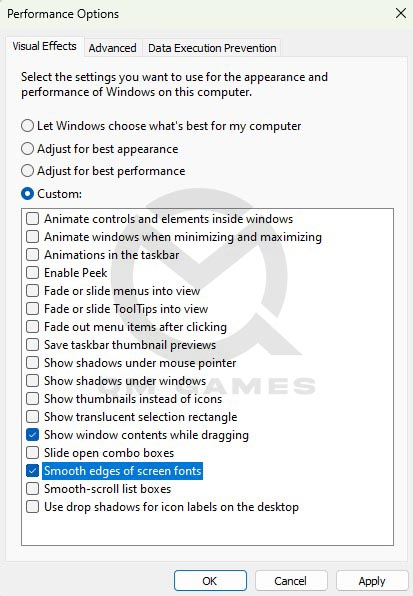
Let’s remove the unwanted visual elements of Windows that may be consuming resources in the background. Here are the steps you need to follow.
- In the Windows Search, type Adjust appearance and performance and open it
- In the Visual Effects tab, click on Adjust for Best Performance
- Check Smooth Edges of Screen Fonts
- Check Show Window Content While Dragging
- Click on Apply
Increase Virtual Memory
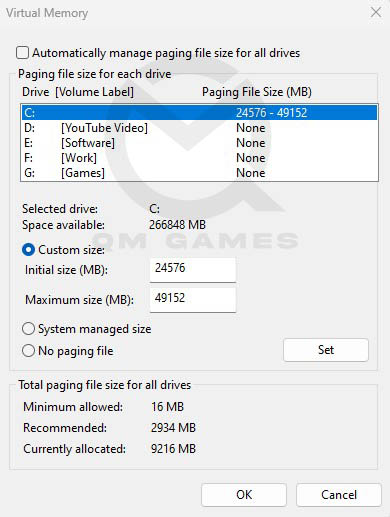
- Now, go to the Advanced tab in the same Performance Options window
- Under Virtual Memory, click on Change
- Disable the Automatically manage paging file size option
- Enable Custom Size and add the following values
- Initial Size (MB) – 1.5 X Total RAM (For 16 GB RAM, 16 x 1024 MB = 16,384 MB, 16,384 MB x 1.5 = 24,576 MB)
- Maximum Size (MB) – 3 X Total RAM (For 16 GB RAM, 16 x 1024 = 16, 384 MB, 16,384 MB x 3 = 49,152 MB)
- Click on Set and OK.
Change Compatibility Settings
Next, let’s change the compatibility settings of the game to improve lag and further improve the game’s performance. Here are the steps you can follow.
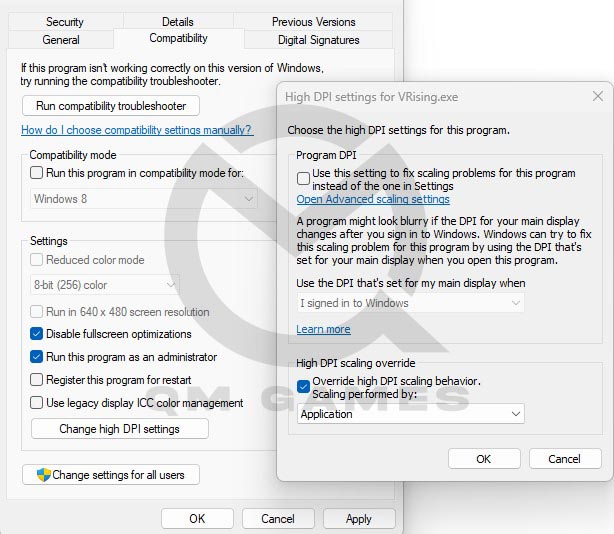
- Go to C:\Program Files (x86)\Steam\steamapps\common\The First Descendant (default steam folder location)
- Right-click on TheFirstDescendant.exe file > Properties > Compatibility
- Check Disable fullscreen optimizations
- Check Run this program as an administrator
- Click on Change High DPI Settings
- Check Override High DPI scaling behavior and set it to Application
- Click on Ok
- Click on Apply and Ok.
Enable Clean Boot
A clean boot environment ensure that no background application is hindering the process of the game or consuming too many resources. Here are the steps you can follow.
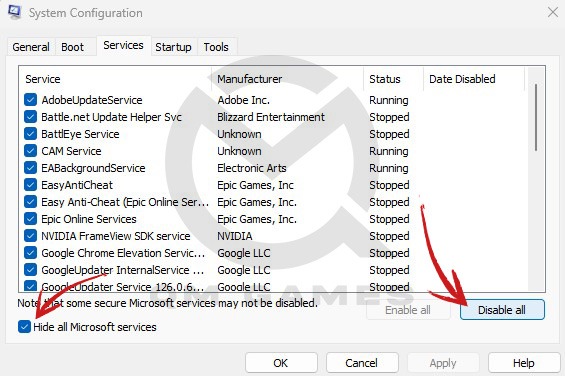
- Use the Run command or press Windows key + R
- Type in msconfig in the search bar and press enter
- Go to Services and check option for Hide all Microsoft Services
- Select the Disable All option
- Open Task Manager and disable the tasks one at a time
- Restart PC
Create Registry Backup and System Restore Point (Run- SystemPropertiesProtection)
You need to create a restore point for the next fix, which is to install out custom FPS pack that consists of registry settings to boost FPS, reduce lag and stuttering. Here are the step you can follow.
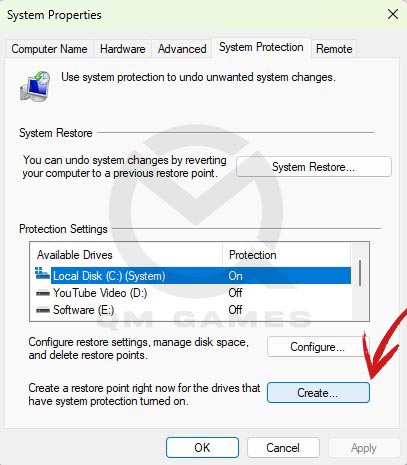
- Press Windows Key + R and paste SystemPropertiesProtection, hit Enter
- Select the System Drive and click on Create
- Name the restore point and wait for the process to complete.
To restore the PC and the default Registry values, simply click on System Restore in the same window and choose the restore point.
Download our Custom FPS Pack
We have created a list of Registry Files that you can download from our Google Drive and double-click to install them. These files will bring specific changes to your registry that will fix the Elden Ring lag and stuttering and boost the game’s FPS.




tried this, game won’t launch at all now. rip
was the game launching earlier? After which fix this happened?
went backwards through the changes trying to undo a lot of random bits, not launching it as an admin fixed it somehow. can’t explain