The second edition of the revamped FIFA franchise from EA is here, and while the game plans to unlock on all platforms on 27 September, you can get seven days of early access if you order the Deluxe Edition of the game, or you can get a glimpse into the game by subscribing to the EA Play, which gives you a 10-hours trial like all EA Games. Players who paid a considerable amount for the early access complain that EA Sports FC 25 is stuck on the loading or title screens. If you are facing the same issues, there are certain things you can do to fix the problem on your end. Here are all the solutions we suggest. This guide will be updated regularly during the first few weeks of the release to provide you with the best fixes possible.
- Fix FC 25 Stuck on Loading or Title Screen
- Rename FC 25 in Documents or Delete the Config File
- Try Playing Other Game Modes
- Reinstall the EA Anticheat
- Set Exception for EA Anticheat and FC 25
- Close Unnecessary Background Applications or Perform a Clean Boot
- Clear EA App Cache and Repair FC25
- Update the GPU Driver
- Disable Control Flow Guard
- Use the Compatibility Mode
- GPU Rendering OpenGL Settings
- Disable the Overlay in the EA App
Fix FC 25 Stuck on Loading or Title Screen
There are many solutions to try, and it must be frustrating when all you want to do is play—what you paid the extra for. However, these solutions are a collection of fixes that have worked for other players, so give this a shot until the devs do something about the issue.
Rename FC 25 in Documents or Delete the Config File
The config file is often why you may be stuck on the loading screen. Maybe there is a bug, you modified the game’s settings, or there is some other issue. Go to the Documents in Windows and look for the FC 25 folder, rename it FC 25CS, and then reboot the PC, and try playing the game. When you relaunch the game, it will create a new FC 25 folder, and the problem should be resolved. If the problem persists, go back to the Documents folder, and inside the FC 25 folder, find and delete the FC config .ini file.
Try Playing Other Game Modes
As we have seen in the past, certain game modes may be bugged. Try playing another game mode and see if the issue persists.
Reinstall the EA Anticheat
If you can launch the offline mode, but the online modes are stuck on the loading screen, it could be due to a fault of the EA anti-cheat, which is corrupted, or the Windows Firewall may be blocking the game. Here is how to uninstall and reinstall the EA Anticheat.
Uninstall the EA Anticheat
- Open the Windows Explorer and search for C:\Program Files\EA\AC
- Click on EAAntiCheat.Installer.exe to launch the installer.
- If you want to uninstall it for one game, choose the game you want to uninstall EA anticheat from and click Uninstall.
- If you want to uninstall it for all EA games, choose Uninstall All. This will remove all EA anti-cheat files from your computer, minus the installer.
Install the EA Anticheat
- Download the EA anti-cheat installer.
- The link will automatically download the installer onto your browser.
- Click the game you want to add EA anti-cheat to.
- Click Install.
Set Exception for EA Anticheat and FC 25
Depending on your antivirus, set an exception for both the EA Anticheat and the FC 25 game. We have an extensive guide that details all the steps to put an exception on all primary antivirus and firewall software, including the Widnows Firewall. Follow the guide to set an exception.
Close Unnecessary Background Applications or Perform a Clean Boot
Close all background applications that are not essential when playing the game, as they can conflict with the game. You can also perform a clean boot, which essentially does the same thing. Open the Task Manager and close all unnecessary tasks. If another anti-cheat from a different game is running in the background, you will want to close it first and check if the game works. You can refer to this guide on how to perform a clean boot.
Clear EA App Cache and Repair FC25
To clear the cache from the EA App, select the three dashes in the far-left corner of the app > Help > App recovery > Clear cache. Once the cache is cleared, repair the game files by selecting the game from the Library > Manage > Repair.
Update the GPU Driver
This fix is a no-brainer, and anyone playing the game for some time would try this as the first fix. However, when installing the latest driver, ensure that you perform a clean install. This essentially removes the old driver and then installs the new one, eliminating the risk of overwritten or missing files. Also, check for the latest driver directly on the NVidia website or the GeForce Experience app.
Disable Control Flow Guard
Sometimes, Control Flow Guard, a security feature on Windows, can prevent games from accessing folders on the drive. This can lead to the game being stuck at the loading or title screen. Here are the steps you can follow to disable the Control Flow Guard.
- Press Widnows Key + I > Privacy and Security
- Go into Windows Security > App and Browser Control > Exploit protection settings > Turn off the Control Flow Guard.
Use the Compatibility Mode

This is a weird fix, but it works to run many games and apps failing to start. To fix this, you need to locate the game folder. From the EA App, click on the three lines in the upper left corner and go to Settings > Download.
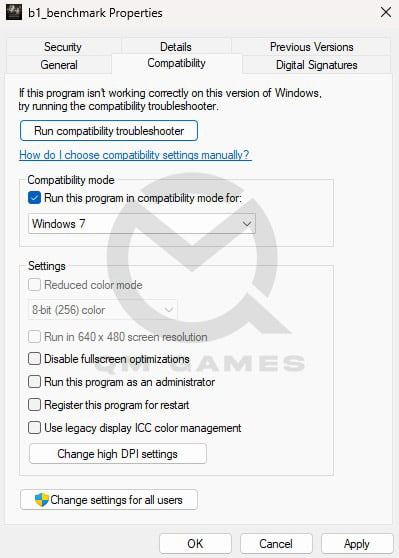
Look for the FC 24 executable file and select it by right-clicking> Properties > Compatibility. Then, choose a previous version of Windows (e.g., Windows 7 or 8) and apply the changes. Do the same with the EA Anticheat file.
GPU Rendering OpenGL Settings

For users who use the Nvidia GPU, you will have access to the Nvidia Control Panel. Search and open the program from the Windows Search bar. Go to Manage 3D Settings and scroll down to find the OpenGL Rendering GPU; change it from auto-select to your GPU.
Disable the Overlay in the EA App
Overlays cause games to crash and get stuck on the loading screen many times, not just on the EA app but also on Steam. To turn this off, go to Settings > Application and scroll down to In-game overlay.


