Warbling Shores Styxia in Honkai: Star Rail is not just an eyesore feast—it’s a loot paradise for hardworking players too. Scattered across its underwater ruins, majestic courtyards, and dark passageways are treasure chests full of Stellar Jade, credits, materials, and other treats.
But these chests are not just lying in the open. Some are concealed behind environmental objects, hidden behind foes, or along paths that are easy to overlook. In this guide, we will lead you through all treasure chest locations in both F1 and B1, so you collect every last one.
B1 Treasure Chest Locations
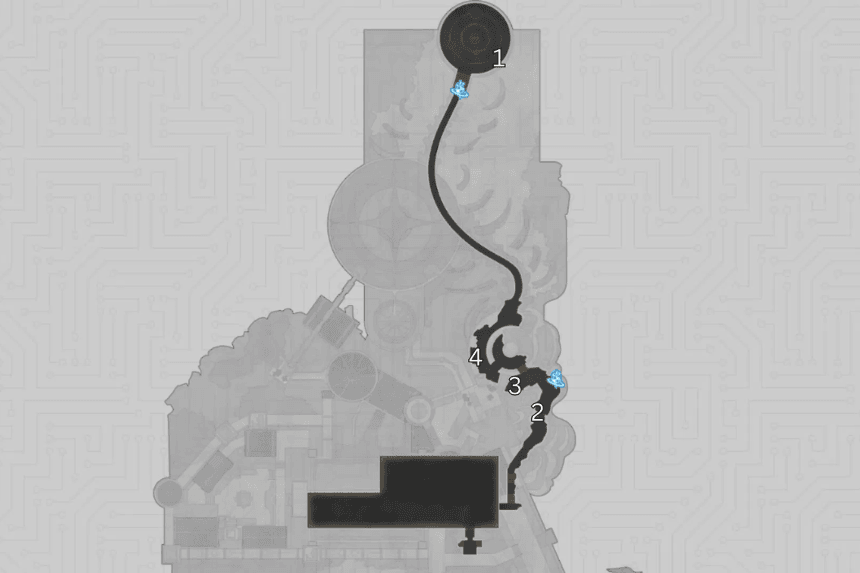
Warbling Shores Styxia B1 floor is black with broken scattered structures and underwater ruins. The chests here try to blend into the background, so observe architectural details and lighting contrast.
B1 Chest 1 – Between Broken Pillars
Start at the Seabed of Luminous Remains waypoint. Head right, keeping an eye on the stone structures. Between two large broken pillars, you’ll spot the first chest resting in the sand.
B1 Chest 2 – Somber Altar of Candles
Teleport to Gloomy Altar of Candles anchor. Go from the spawn point leftward, in front of a half-destroyed stone pillar. The chest is lying right next to it and is weakly illuminated by candle light.
B1 Chest 3 – Candle Cluster Corner
Leave the last position and proceed in the direction of the Seabed of Luminous Remains waypoint, then go left. The third chest will be found with a cluster of burning candles around it beside the wall.
B1 Chest 4 – Behind the Broken Wall
Make your way through the opening into the next corridor until you see a broken section of wall. The fourth and final B1 chest is located at the far end of this narrow passageway.
F1 Treasure Chest Locations
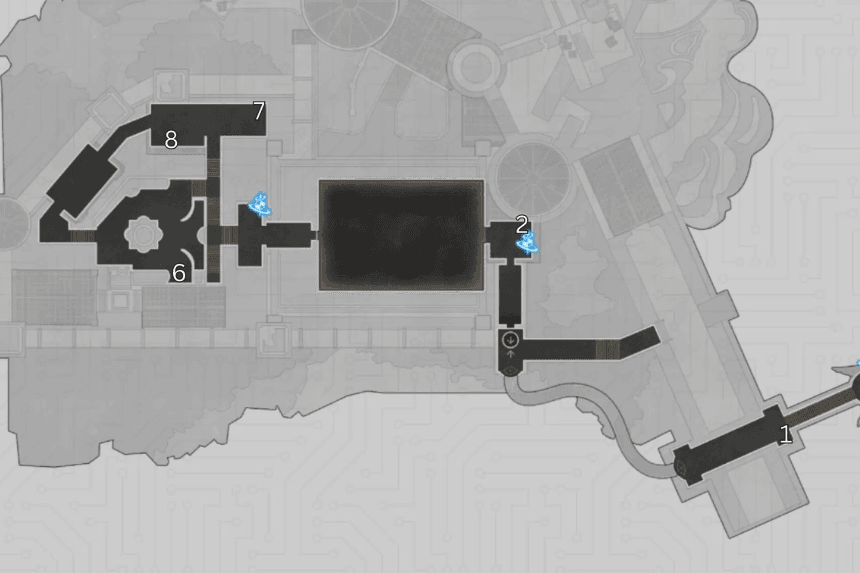

The F1 level is more complex, with chests in high-traffic zones, concealed behind large furniture, and occasionally guarded by enemies. You will be willing to walk on bridges, courtyards, and catwalks as you hunt them down.
F1 Chest 1 – Revelry’s Keep Staircase
From the anchor in Revelry’s Keep, head down the stairs in front of you. Look directly to your left immediately—this chest is in front of the wall next to the stairs.
F1 Chest 2 – Passage of Treasures Spawn
Head to the Passage of Treasures anchor. The second chest is right next to the anchor, a bit to your right when you get there.
F1 Chest 3 – Behind the Giant Door
Follow the Passage of Treasures through the large double door forward, then turn right. Move down the corridor to the last where the chest is.
F1 Chest 4 – Before the Left Staircase
Cross through the middle room on the bridge. Just before the left staircase, look in the corner opposite for the fourth chest.
F1 Chest 5 – Before the Elevator
Head down the left staircase from Chest 4’s location. The chest will be tucked near the elevator platform at the bottom.
F1 Chest 6 – Ariose Fountain Courtyard
Start at the Ariose Fountain Courtyard waypoint. Move downward along the main path, take a left turn, and you’ll spot the sixth chest in a shaded alcove.
F1 Chest 7 – Stagnant Shadow Stage
At the Stagnant Shadow stage, this chest is positioned behind an enemy. Defeat the enemy to be able to retrieve the reward safely.
F1 Chest 8 – Behind the Second Table
Approach the next room from the Stagnant Shadow area. The last chest is located behind the second table on your right.