CS2 lag and stuttering can make life difficult, whether playing casually or in a competitive match. Various reasons can lead to the game lagging. We have attempted to reduce lag, fix stuttering, and boost FPS in Counter-Strike 2 from all possible scenarios. We also have a Lag and FPS pack that changes your registry for better performance. Here are all the fixes you can try.
- Fix Counter-Strike 2 (CS2) Lag and Stuttering
- Use ISLC to Clear Memory Standby List
- Disable Power Throttling – Click on the Battery Icon and Set it to Best Performance
- Disable Game Bar
- Turn on Game Mode
- Turn on Hardware Accelerated GPU Scheduling & Optimizations for Widnowed Games > Choose High-Performance GPU
- Increase Virtual Memory
- Use Exit Lag for FPS Boost and Reduce Lag
- Change Compatibility Settings
- Enable Clean Boot
- Adjust appearance and performance – Set to Adjust for Best performance (check 1. Smooth Edges of Screen Fonts 2. Show Window Content While Dragging)
- Change In-Game Settings
- Create Registry Backup and System Restore Point
- Download our Custom FPS Pack
Fix Counter-Strike 2 (CS2) Lag and Stuttering
The CS2 fixes listed in this post all have the possibility of improving your gaming experience. So, take time and try all the fixes one at a time. Do check the game’s performance after every few fixes. So you know which fixes work best for resolving the CS2 lag and stuttering.
Use ISLC to Clear Memory Standby List

ISLC is software from the makers of DDU and is very effective in clearing RAM cache or the Standby List, which has great potential in hosting FPS, reducing stutters, and lag in games. You can download the software here. Once downloaded, go with the default settings and press Start. Clear the Standby List after booting the game each time if you see improvements.
Disable Power Throttling – Click on the Battery Icon and Set it to Best Performance
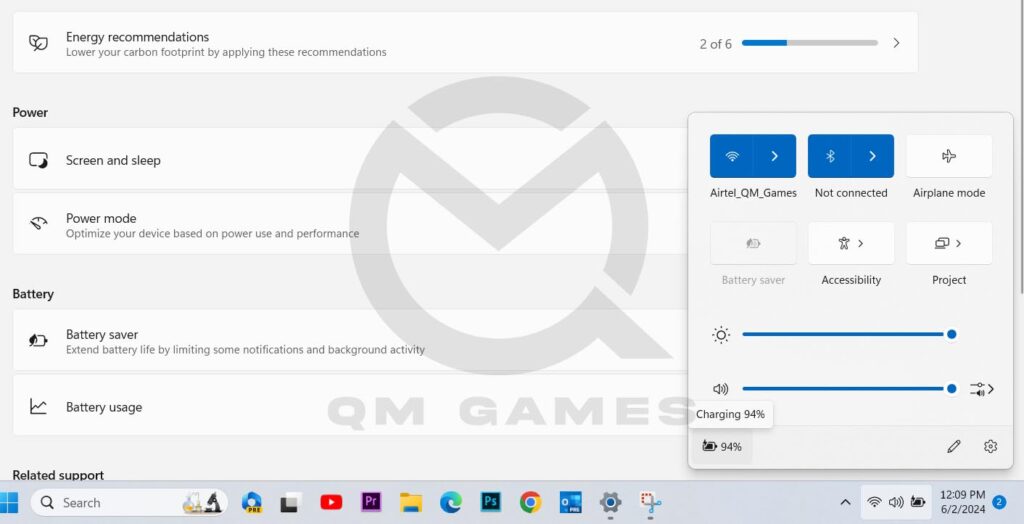
To apply this fix, you should be on a laptop as this solution does not apply for users on a desktop. Look in your Tray Bar and click on the Battery Icon > Power Mode > choose Best Performance
Disable Game Bar
Disabling the Game Bar and the next few fixes are to optimize the PC for the best performance to boost the Counter-Strike 2 FPS, and reduce stutters. To disable the Game Bar, here are the steps you need to follow:
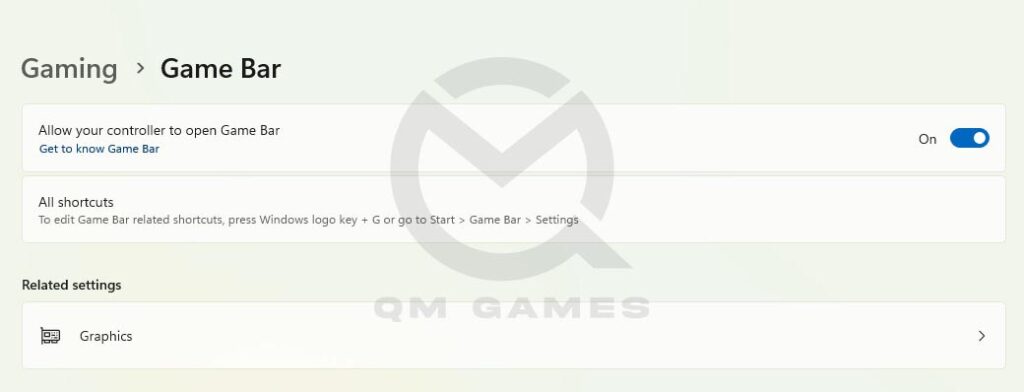
- Press Windows key + I to go into Settings
- Then, go into Gaming > Game Bar
- Toggle Off the Game Bar
Turn on Game Mode
Game Mode is a great feature that optimizes the PC for the best gaming performance. It can boost FPS, and reduce stutters and lag in CS2. Here are the steps you need to follow.
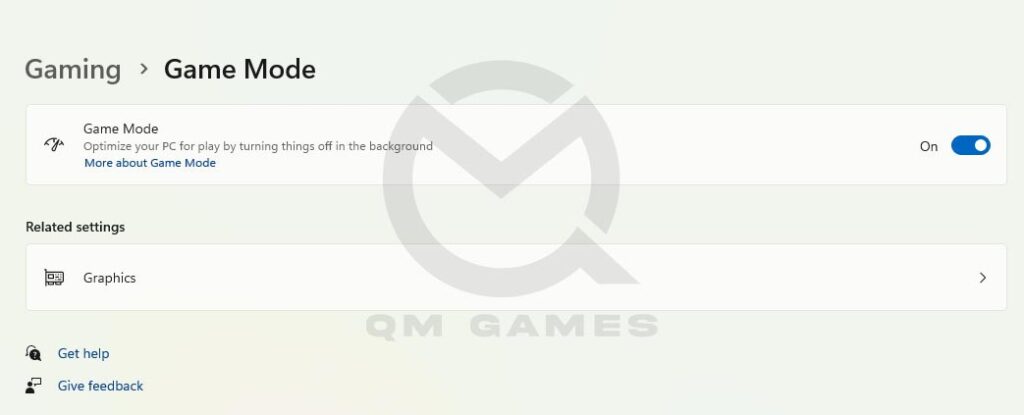
- Press Windows key + I to go into Settings
- Then, go into Gaming > Game Mode
- Toggle On the Game Mode
Turn on Hardware Accelerated GPU Scheduling & Optimizations for Widnowed Games > Choose High-Performance GPU
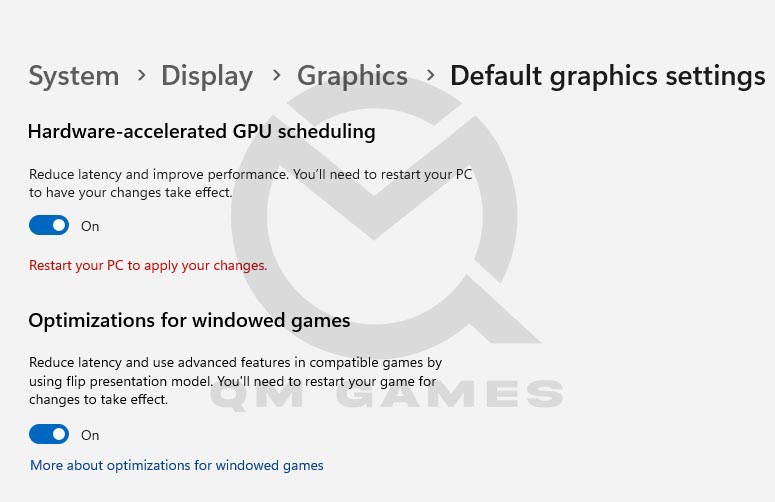
The next fix you need to do which can also be found in the gaming section is to turn on the Hardware-Accelerated GPU Scheduling and Subsequently Choose the High-Performance GPU. Here are the steps you need to follow.
- Press Windows key + I to go into Settings
- Then, go into Gaming > Game Mode > Graphics
- Click on Browse under Custom options for apps and add the game executable to the list
- Click on Options on the CS2 file and choose High-Performance GPU
- Next, click on Change default graphics settings at the top under Default settings
- Toggle on Hardware Accelerated GPU Scheduling & Optimizations for Widowed Games
Increase Virtual Memory
The next fix to further boost the PC for the best performance is to increase the size of the virtual memory. Here are the steps you can follow:
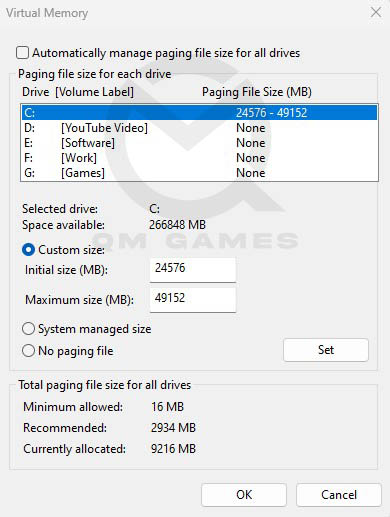
- In the Windows Search, type and click on View Advanced System Settings
- In Advanced, under Performance, click on Settings
- Go to the Advanced tab and click on Change under Virtual Memory
- Uncheck Automatically manage paging file size for all drives
- Check Custom Size and enter the below values
- Initial Size (MB) – 1.5 X Total RAM (For 16 GB RAM, 16 x 1024 MB = 16,384 MB, 16,384 MB x 1.5 = 24,576 MB)
- Maximum Size (MB) – 3 X Total RAM (For 16 GB RAM, 16 x 1024 = 16, 384 MB, 16,384 MB x 3 = 49,152 MB)
- Click on Set and OK.
Use Exit Lag for FPS Boost and Reduce Lag
If your game is lagging, Exit Lag can make a difference. The software has several features tied into one that can improve connectivity issues, optimize the PC for FPS boost, and most importantly reduce lag. After installing the software, you only need to choose the game you want to play, and the nearest server, ExitLag, handles the rest.
Change Compatibility Settings
To change the compatibility settings, you must first find the game executable. Go to the Game Settings on Steam > Installed Files > Browse. You will find the executable at this location. Follow the below steps.
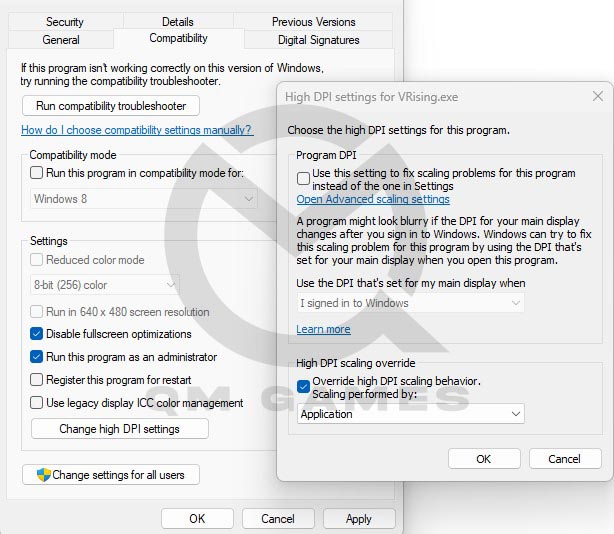
- Right-click on the .exe file and choose Properties
- Go to the Compatibility tab
- Put a check on Disable fullscreen optimizations and (optional – Run this program as an administrator)
- Click on Change high DPI settings
- Put a check on Override high DPI scaling behavior. Scaling performed by: Application
- Save the changes.
Enable Clean Boot
Running CS2 in a clean boot environment ensures that no other program is either taking away the resources or interfering with the network that can cause lag and FPS drop. Here are the steps you can follow:
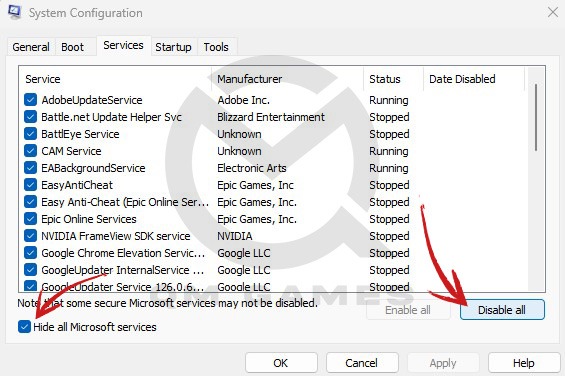
- Press Windows Key + R and type msconfig, hit Enter
- Go to the Services tab
- Check Hide all Microsoft services (Very Important)
- Now, click Disable all
- Go to the Startup tab and click on Open Task Manager
- Disable one task at a time and restart the system.
Adjust appearance and performance – Set to Adjust for Best performance (check 1. Smooth Edges of Screen Fonts 2. Show Window Content While Dragging)
Windows consumes a lot of resources to maintain the visual fediality of the OS, but you do not need most of the features. Here are the steps you need to follow for the next fix.
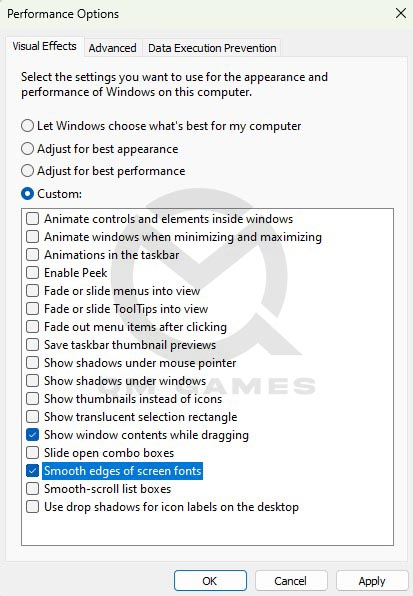
- In the Windows Search, type and open Adjust the appearance and performance for Windows
- Toggle on Adjust for best performance
- Now check Smooth Edges of Screen Fonts and Show Window Content While Dragging (if you toggle off these two options, the OS experience will suffer. You can try all the options and see which you care for and disable all others.)
- Save the changes.
Change In-Game Settings
WORK-IN-PROGRESS
We are still experiemenign to find the best settings for the game. Once we do, we will update this section with the best settings to play CS2.
Create Registry Backup and System Restore Point
In order to proceed to the last fix and take advantage of our custom regustry changes that can imporve the FPS and reduce Lag in CS2, you need to take a backup of your registry or create a restore point. In case, something goes wrong or you want to go back to your previous settings, you can easily use the restore point. Here are the steps you need to follow:
Crete a restore point
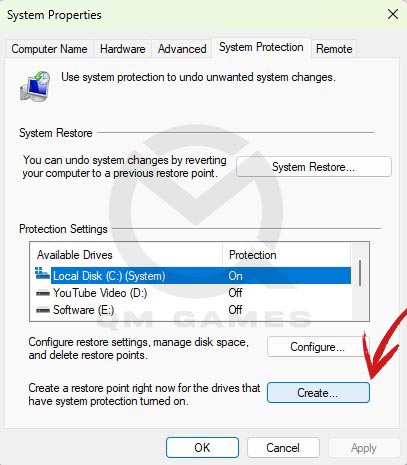
- In the Windows Search type, Create a Restore Point
- Choose the OS Drive and Click on Create
Use the Restore Point
- In the Windows Search type, Create a Restore Point
- Click on System Restore and follow screen prompts.
Download our Custom FPS Pack
We have created a list of Registry Files that you can download from our Google Drive and double-click to install them. These files will bring specific changes to your registry files that will fix the CS2 lag and stuttering and boost the game’s FPS.
