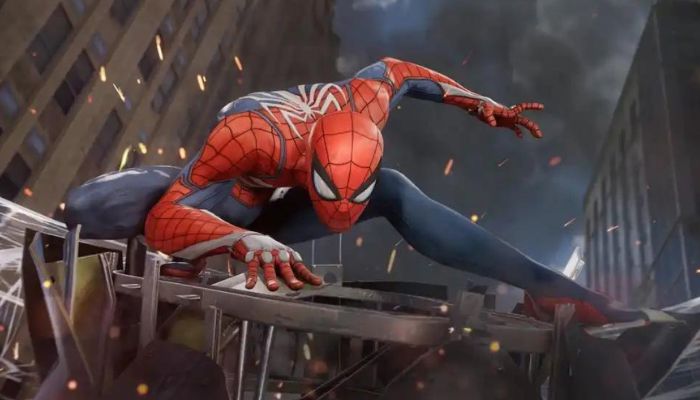
Marvel’s Spider-Man released on the PlayStation 4 in 2018 for the first time. Similar to the time they missed GTA V, PC users are upset. The same game was then remastered for the PlayStation 5 in 2020, and today the PC version of the game is available.
We literally had to wait for like 4 years to play this incredible game. Regarding graphics, PC users will receive the Remastered version of the game, which is similar to the PS5. It is pretty clear that the game’s visuals will be greatly enhanced from the base version.
UPDATE AT THE BOTTOM OF THE POST!
System Requirements
Let’s talk about the system requirements before we dive into this game’s graphics settings. When your hardware is inadequate, there is no point in turning your settings all the way down and expecting smooth performance. You must at least have a setup that satisfies the game’s minimal requirements.
MINIMUM:
Requires a 64-bit processor and operating system
OS: Windows 10 64-bit
Processor: Intel Core i3-4160, 3.6 GHz or AMD equivalent
Memory: 8 GB RAM
Graphics: NVIDIA GTX 950 or AMD Radeon RX 470
DirectX: Version 12
Storage: 75 GB of available space
RECOMMENDED:
Requires a 64-bit processor and operating system
OS: Windows 10 64-bit
Processor: Intel Core i5-4670, 3.4 Ghz or AMD Ryzen5 1600, 3.2 Ghz
Memory: 16 GB RAM
Graphics: NVIDIA GTX 1060 6GB or AMD Radeon RX 580 8GB
DirectX: Version 12
Storage: 75 GB of available space
Possible Fixes for Marvel’s Spider-Man Remastered Shuttering and FPS Drop – Boost Performance
The more powerful your PC, the higher you can go visually without sacrificing performance. People who have setups that are better than the recommended requirements do not need to be concerned about lowering the visual quality for performance. If you play at native resolution, they will get playable frame rates even when you max out the visual fidelity in-game. These are some of the best methods with which you can completely remove the stuttering problem in Marvel’s Spider-Man Remastered.
Tone Down Graphics Quality Settings
Reduce the graphics settings in-game from the game menu to see if that helps. To resolve black screen issues, disable V-Sync, Shadow effects, and Anti-Aliasing, and try running the game at a lower display resolution.
There are numerous options for reducing or completely eliminating stuttering in games. However, resolving this problem is a multifaceted process that frequently necessitates several solutions and some detective work.
While you should always start with the hardware settings and recommended game settings, you should also manually adjust your game settings to ensure that the game runs as smoothly as possible with your current specs.
Turn On Hardware-Accelerated GPU scheduling

Only NVidia GPUs support hardware scheduling at the time of writing. Keep an eye out for future updates from AMD and Intel that will include support for this feature.
Once you’ve determined that you have a compatible GPU, double-check that it is using the most recent drivers. If your computer meets all of the requirements, it’s time to enable Windows 10’s GPU hardware scheduling feature.
To enable GPU hardware scheduling, follow these steps:
- Go to Settings > System after clicking Start.
- Select Display from the left-hand menu.
- Click Graphics settings just below Multiple Displays.
- Turn on the Hardware-accelerated GPU scheduling toggle.
- Start your computer again.
Run Game as an Administrator

Run the game’s exe file as an administrator to prevent issues with user account control and privileges. You should also run the Steam client as an administrator on your computer. To do so:
- Choose Properties by right-clicking the exe shortcut file on your computer.
- choose the Compatibility tab after selecting Properties.
- Check the box next to “Run this program as an administrator.”
- After selecting Apply, click OK to save your changes.
Disable Full-Screen Optimizations
- Go to the win64 directory to get started. [Go there if the Steam client or game is installed on a different drive or location.]
- Select Properties by performing a right-click on the Game exe file
- On the Compatibility tab, deactivate the toggle for Enable Fullscreen Optimizations.
- Apply and then OK will save changes.
- On the same compatibility page as admin rights, you can find the option.
Check For Driver Update

Check your computer’s graphics driver update status to see if it needs to be updated. A corrupted driver or an out-of-date GPU driver version can occasionally lead to a number of issues. It will also help you fix applications’ or games’ black screen problems. To do so
- The Quick Link Menu can be accessed by pressing Windows + X simultaneously.
- Select Device Manager and then double-click Display Adapters from the list.
- Select Properties by performing a right-click on the dedicated graphics card you are using.
- Next, select Automatically search for drivers under Update driver.
- The system will automatically download and install an update if one is available.
- Restart the computer to apply the changes after that.
Exit all Overlay Applications
Some impacted players claim that while gaming, overlay applications can run in the background, using up system resources and interfering with gameplay. Disabling them before starting the game will be helpful if you’re not using a specific overlay application for chatting, taking screenshots, or recording gameplay sessions.
Disable the Steam overlay, Xbox Game bar, and the Nvidia Geforce overlay if you have any, as these programs are major contributors when it comes to crashing some games. To remove these overlays, follow the steps below.
Turn off Steam Overlay
- Start the Steam client first.
- Click Steam in the client’s upper left corner.
- Access Settings.
- Choose “In-Game.”
- “Enable the Steam Overlay while in-game” is a checkbox that should be unchecked.
- Click the “OK” button.
Turn off the Xbox Game Bar
- Select Start from the menu.
- Choose Settings.
- Click Gaming.
- Switch off the Xbox Game Bar.
Turn off Nvidia Geforce Experience Overlay
- Start NVIDIA GeForce Experience first.
- Go to the gear icon or Settings.
- Disable the overlay in-game.
Verify the game file’s integrity

Additionally, it’s a good idea to check the game files and attempt an automatic repair with the Steam client.
- Open Steam, and go to the Library.
- Properties can be accessed by right-clicking Marvel’s Spiderman Remastered game.
- The Local Files tab can be accessed by clicking on Properties.
- Choose Check Game File Integrity…
- This procedure will start by verifying and inspecting each installed game file to see if there is a missing or damaged file.
- Let the procedure run its course. To make the changes effective, quit Steam and restart your computer.
- Lastly, restart Steam and attempt to run the game again.
Exit Unnecessary Processes or Services

Running too many programs and processes significantly reduces system response time. Even with high FPS, game stuttering is common when your GPU and CPU require more time to handle the data transition. Follow these steps to gain a better understanding of what’s slowing down your system and eliminate those unnecessary tasks:
- Open Task manager using Cntrl+Shift+Esc.
- Select the apps and background processes that are using the most CPU and GPU resources in the Processes tab, and then click End task to save resources for your game.
- Go to the Details tab, right-click your game’s executable, and set the priority level to High.
These are some of the most effective fixes as reported by Reddit and Youtube users.
Also Read: Where to Find All Upper West Side Backpack Locations in Spider-Man Remastered
Update 17 Aug 2022 [New Fixes] Stuttering and FPS Drop Spider-Man Remastered PC
We have already done a guide on how to fix stuttering and FPS drop in Spider-Man PC, but a lot of users did not find the guide of much help. So, we have come up with some new solutions that can hopefully ease the stutter and low FPS. The game has optimization issues and memory leak problems, so the permanent fix can come only from the devs. Having said that, the below solutions have helped a lot of players. With some luck, it may help you as well and get the game to perform better. Keep reading to find out.
- Disable Hyperthreading or SMT in your BIOS. CPUs with Hyperthreading or SMT seem to have the most problem with the game. The experience is much better after you disable it.
- Don’t use any of the Upscaling techniques and disable Raytracing to prevent memory leak and hopefully get better FPS and reduce stutter. You can find both the setting in the game’s graphics settings.
- The Steam Input seems to cause issues with the game as well. It’s a fix suggested by the devs for the controller not working but works great to reduce the micro stutter.
- If your game is stuttering, you must roll back the driver to before the current one. A user has suggested that the driver for F1 22 works great with the game. Nvidia claims that the issue is not with the driver, but user reports say otherwise. Try it, there is no harm in it and with some luck, your problems will be fixed. The driver version you want to install is version 512.95
- Lower Anisotropic Filtering to see some minor improvement in the frame rate.
We will update the guide further in the days to come.


I fixed the lag issue by connecting a PS4 controller to my PC via bluetooth. All the lag went away and now it feel exactly like I’m playing on a PlayStation. https://youtu.be/0kQHaK5NAP8